Pheasant Wing Caddis
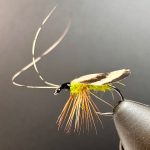
Emerger
Tied By Joe Glessner
Hook: Fulling Mill FM5050 Ultimate Dry Fly Black Nickel Barbless Hook, size 12
Thread: Semperfli 6/0 Classic Waxed Thread, Black
Body Parts: abdomen, hackle, thorax, wing, antenna
Materials: Hareline Dubbin, Caddis Green, Metz Size 12 Dry Hackle, size 12, Hareline Dubbin, Caddis Green, Ringneck Pheasant (male) Church Window Feather, Coq De Leon saddle hackle fibers (or other suitably long hackle fibers)
Notes:
The Pheasant Wing Caddis can be fished as an emerger, spent adult, or even (with enough floatant) as a dry.
I’ve tied it in a size 12 here but it is effective down to a size 16 (smaller even I would imagine) and I’ve taken fish on these tied as large as a size 8.
Tying Instructions
- Start thread a hook eye length back from the eye of the hook creating an index point, and wrap back to the bend of the hook.
- Thinly dub the abdomen and wrap forward about half way to the index point.
- Tie in the hackle on the hook just in front of the abdomen, shiny side up.
- Apply just a bit more dubbing and wrap forward just enough to palmer the hackle 3-4 times.
- Palmer the hackle forward 3-4 tight turns taking care to keep the shiny side forward, tie it off, and trim free the excess.
- Mount two Coq De Leon hackle fibers to the top of the hook so they extend out to either side of the eye of the hook and wrap your thread back to where you tied off the hackle.
- Trim the hackle on top of the hook close to help position the wing.
- Prepare your pheasant wing: select a Church Window feather that is slightly larger than needed. Remove the fluff and trim the excess rachis to a manageable size. Mount feather shiny side up to the sticky side of clear packing tape (dull side of the feather stuck to the tape) taking care to keep the feather barbs together, and trim the tape to the edges of your feather. Fold the feather neatly in half along the rachis so that the shiny side of the feather is out and the non sticky side of the tape is underneath. Size the feather to the hook, and trim in a half heart shape while folded starting at the rear of the feather (this will produce the appropriate wing shape, see additional images).
- Mount the wing: place the folded and trimmed feather so that your first wrap of thread will be 3-4 fibers back on to the folded feather. This will keep the wing flat against the body. Secure the wing and trim the excess rachis.
- Dub just a bit more thread and wrap forward just enough to cover the tie in point of the wing, ending at the index point.
- Create a small thread head behind the eye of the hook.
- Whip finish and apply head cement if desired.
- Carefully and gently stroke a fingernail over the top of the antenna to curl them upwards.
Note: The CDL antenna are sturdier than they look, but less sturdy than you’d like when trying to get them to curl. It doesn’t take much pressure to get them to curl appropriately. If they curl too much, running a fingernail on the opposite side of the fiber will let you try again.
You may find it helpful to tie a couple of the fibers to a bare hook and practice the curl before tying the fly.
The antenna are entirely optional, and I often omit them from flies intended to catch fish rather than fishermen.
Note 2: I like the pattern from Church Window feathers but you can also use Almond Heart feathers, or even the blue/green back feathers as well. The back feathers can be particularly effective if your local Caddis adults tend to be very green.
https://flyvault.net/wp-content/uploads/formidable/13/IMG_0502-150×150.jpeg, https://flyvault.net/wp-content/uploads/formidable/13/IMG_0503-150×150.jpeg, https://flyvault.net/wp-content/uploads/formidable/13/IMG_0513-150×150.jpeg, https://flyvault.net/wp-content/uploads/formidable/13/IMG_0512-150×150.jpeg, https://flyvault.net/wp-content/uploads/formidable/13/IMG_0537-150×150.jpeg, https://flyvault.net/wp-content/uploads/formidable/13/IMG_0540-150×150.jpeg, https://flyvault.net/wp-content/uploads/formidable/13/IMG_0541-1-150×150.jpeg, https://flyvault.net/wp-content/uploads/formidable/13/IMG_0542-150×150.jpeg, https://flyvault.net/wp-content/uploads/formidable/13/IMG_0543-150×150.jpeg, https://flyvault.net/wp-content/uploads/formidable/13/IMG_0545-150×150.jpeg, https://flyvault.net/wp-content/uploads/formidable/13/IMG_0546-150×150.jpeg